
Victoria Fire Department Badge Wallets: Chief and Firefighter Outlines Compared

Victoria Fire Department has two separate badge patterns in the Hammer & Axe library: Chief and Firefighter, labelled FF. The difference is visible in the perimeter, not simply in the wording or colour on the badge face.
If you are ordering a Victoria Fire Department badge wallet, identify the physical badge first. That is especially useful for a promotion gift, a replacement wallet or a group purchase involving more than one rank. Choosing the department name alone leaves an important part of the fit undecided.
Compare the two outlines before choosing a wallet

Open the Badge Library and look for the separate Victoria Fire Department Chief and FF entries. Each links to its own printable PDF.
The Chief template has a taller, elongated outline with shaped sides and a detailed lower edge. The FF template is a shorter shield shape, with a different upper edge and lower point. These are different cutouts, rather than one pattern with a different title stamped into it.
Use the outline that matches the actual badge intended for the wallet. A photograph of a colleague's wallet can show a colour combination you like, but it cannot establish that your badge has the same perimeter.
For a gift, settle that detail with the recipient or a colleague who can check the badge itself. If the occasion is a promotion, be clear about whether the wallet will hold the badge they carry now or a different badge they are receiving.
Download the matching PDF and verify the print scale
Use the Victoria Fire Chief template or the Victoria Fire Firefighter template. Keep the file's Chief or FF label visible while making the comparison.
Print at Actual Size or 100%, with Fit to Page turned off. Check the printed reference rectangle with a ruler: it should measure 100 mm, approximately 3.94 inches. Only compare the badge after that reference measures correctly.
Lay the badge over the tracing and follow the complete outside edge. Pay particular attention to the upper contour, both sides and the bottom. Matching the centre of the badge is not enough if a point or shoulder falls outside the intended outline.
Use the comparison image for identification, not measurement
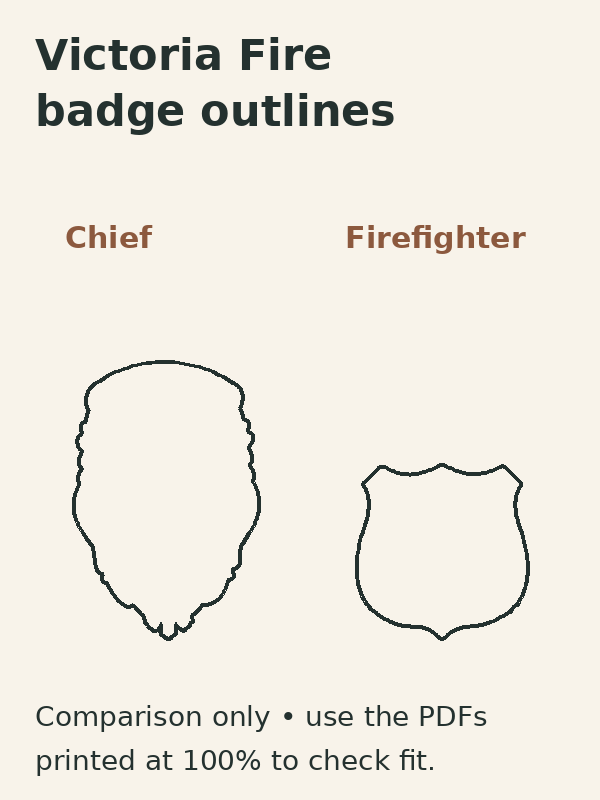
The diagram reproduces the two current template outlines at a common scale so their shapes are easy to compare. It is an illustration within the article; the linked PDF, printed and checked properly, is the tool for confirming fit.
Template label | The distinction to check |
Victoria Fire Department Chief | Taller outline with shaped sides and a detailed lower edge |
Victoria Fire Department FF | Shorter shield outline with a different top and bottom |
If neither pattern lines up, stop at that comparison and show us where it differs. Include overall width and height and photographs of the badge against the correctly scaled printout. Do not choose the closer-looking pattern and expect the leather to stretch into the missing shape.
Check what changed when the badge changed
A new badge number may leave the outline unchanged. A different badge version can change the perimeter, depth or hardware. Those are separate possibilities, so describe the change rather than assuming every replacement needs the same cutout.
Look at the back of the intended badge and identify its actual attachment. The Badge Attachments page explains the standard backers. A correct front outline does not establish whether the rear uses a post, clip, pin or another fitting.
If you are moving a badge from an old wallet, include that mounting arrangement in your enquiry. If a new badge is still being arranged, confirm its final shape and attachment before treating an existing wallet as the reference.
Choose the layout after the badge is settled

Once you know the version, compare the Build Your Own badge wallet layouts around your normal cards, ID and cash. A simple card-and-badge layout, an ID-window model and a cash-carrying model solve different daily needs.
Check the chosen model's current badge dimensions as well as the template. For example, the Moonlighter family lists a narrower badge allowance than the Core, Outlook and Billfold. The pattern identifies the shape; the product specification establishes the available space in that model.
Then choose exterior and interior leather, thread and personalisation. For a mixed-rank department order, keep the Chief and FF cutouts identified separately even if the wallets share one colour scheme.
Hammer & Axe is first responder-owned, and our wallets are handmade in Canada from full-grain vegetable-tanned leather and hand sewn with Ritza Tiger thread. Start with the correct Victoria outline, then build the layout and finish around the person who will carry it.


Comments